Are you aware that modifying your permalink structure can significantly enhance your website’s on-page SEO?
However, if not done correctly, it can lead to severe issues.
I had to learn this the hard way!
Fortunately, there’s a straightforward trick that I discovered, which could have saved me from numerous SEO challenges.
In this article, I’ll reveal everything you need to know about changing permalinks in WordPress without breaking links or losing traffic.
Optimizing your site’s URL structure will boost your rankings and attract more visitors.
What is a Permalink?
A permalink, also known as a permanent link, refers to the complete URL of a specific web page or blog entry.
For instance, the permalink for this article is:
“letsearnit.com/change-permalinks-wordpress”
This URL can be found in the address bar at the top of your web browser.
Why are Permalinks So Important?
Permalinks play a crucial role in on-page SEO.
When you search for a keyword on Google, most first-page results often feature the exact keyword or a variation within their URLs.
For instance, let’s look at the top 6 results on Google when searching for “keyword research tool”:

As demonstrated, the keyword is present in the URL of each result.
Clean and keyword-rich permalinks enhance readability and make a better impression on users.
A concise and descriptive URL leads to a higher click-through rate (CTR), essential for improved rankings.
What Is The Best Permalink Structure For SEO?
To optimize your permalink structure for SEO, follow these two essential rules:
Rule #1: Incorporate your targeted SEO keywords in the URLs, avoiding any unnecessary words
Make sure to include phrases related to your targeted keywords in the URL. Doing so will help improve your chances of ranking on the first page of Google. Including unnecessary words may diminish the importance of your main keywords in the eyes of search engines, so it’s best to avoid them.
Rule #2: Keep URLs as concise as possible
Backlinko’s SEO research suggests that shorter URLs tend to rank better:
Short URLs are also easier to read.
Therefore, remove any unnecessary elements from the URL, keeping only the main words from your targeted keyword.
Moreover, I recommend:
- Refraining from using dates or numerical IDs in your URLs
- Using hyphens to separate words instead of underscores
The good news is that WordPress enables you to easily select the permalink structure for your posts.
Changing Permalinks in WordPress
Managing the URLs of your posts in WordPress is quite simple.
However, if you have already published posts on your site, exercise caution when altering their links.
In the first section, we will explore the ideal permalink structure for your WordPress site. In the second section, we’ll discuss how to handle old URLs if your posts are already indexed in Google.
Before we begin, it’s crucial to export a list of your current URLs.
If your site is new and you haven’t published any posts, you can simply read Section 1: Change Permalink for Better SEO and skip the rest.
Section 0: Creating a List of Your Current URLs
Before changing permalinks, it’s essential to create a list of all your current URLs if you have published posts. You can easily do this by saving your existing blog sitemap.
Here’s how:
If you use the “All In One SEO” plugin:
Go to the XML sitemap section and click on “View your XML sitemap.”
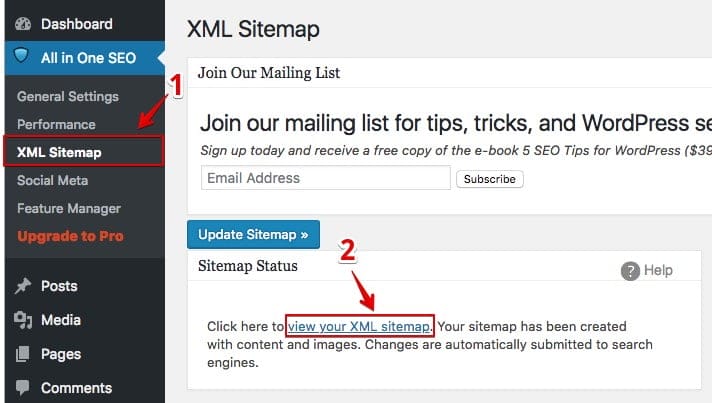
Use Ctrl+A in Windows (Command+A in Mac) to select all the content, paste it into a spreadsheet, and save it as a “CSV” file.
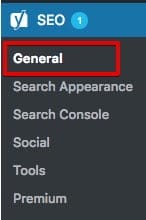
If you use the “Yoast” plugin:
Click on the general settings.
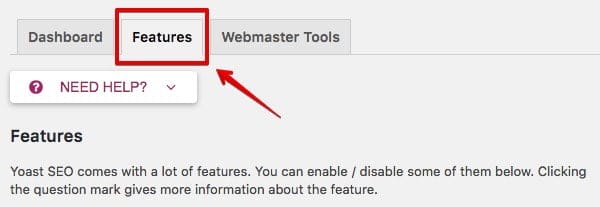
Go to the features tab.
Click on the question mark near the XML sitemap and open the “See the XML sitemap” link.
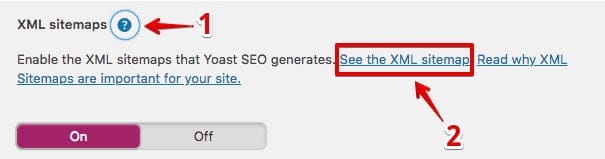
Click on the post sitemap.
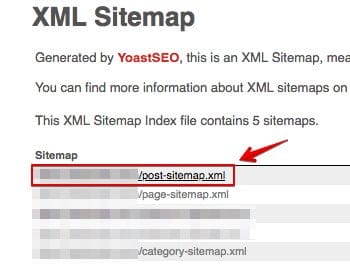
You’ll see a page listing all your posts’ URLs. Use Ctrl+A in Windows (Command+A in Mac) to select all the content, paste it into a spreadsheet, and save it as a “CSV” file.
If you use other plugins:
Go to the URL of the sitemap and save it as a PDF. Usually, it’s located at “YourSite.com/sitemap.xml.”
You’ll need the list of your current URLs for redirection purposes.
To avoid broken links and traffic loss, take two additional steps after changing the links (each step will be explained in detail):
If your website is new and you haven’t published any posts yet, you can set the new permalink structure without doing anything else (follow Section 1).
Section 1: Modify Permalink Structure for Better SEO
Step 1:
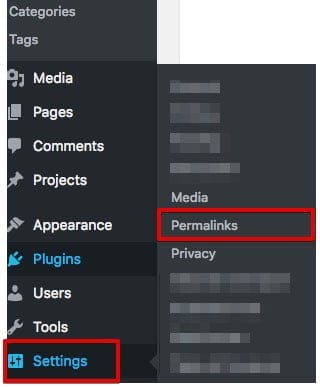
In your WordPress website’s admin panel, navigate to:
Settings > Permalinks
Step 2:
Select one of the structures in the permalink settings:
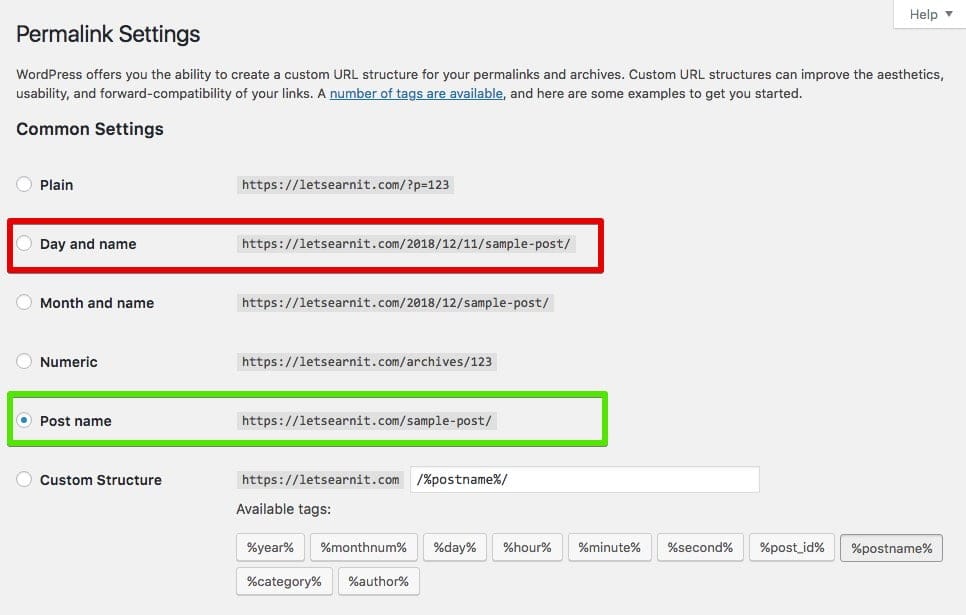
For example, if you choose “Day and name”:
A post titled “What Is The Best Blogging Platform” published on 2023/04/12 on your blog would automatically be assigned this URL:
“YourWebsite.com/2023/04/12/what-is-the-best-blogging-platform”
This URL is lengthy, unappealing, and contains many unnecessary characters.
Therefore, this is not an ideal permalink structure.
The “Post name” option is the best choice.
Select the “Post name” structure if your website focuses on a central topic and you don’t plan to write more than 150 posts.
It is concise, clean, and SEO-friendly.
However, if you intend to have a large collection of posts covering various main topics, including categories could be beneficial for better content hierarchy and topic understanding by Google.
For example, an effective permalink structure could be:
/%category%/%postname%/
You can use the custom permalink structure to achieve this.
Additionally, you’ll need to take an extra step each time you publish a post.
You should modify the permalink of each post.
In the example above, the “Post name” structure automatically generates this URL:
“YourWebsite.com/what-is-the-best-blogging-platform”
Although the unnecessary numbers are gone, it’s still too long.
Edit it in the permalink section of your editor:
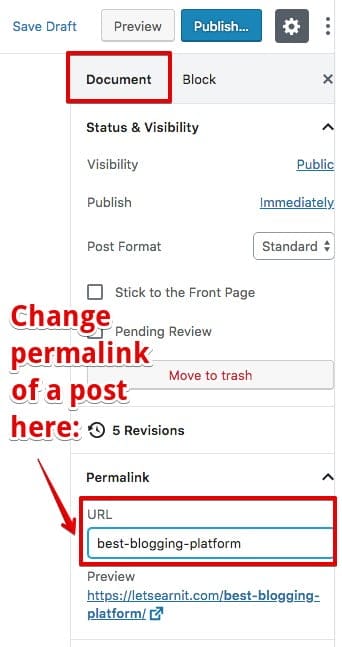
A good practice is to include only the most relevant words.
In this example, the final permalink would be:
“YourWebsite.com/best-blogging-platform”
This link contains the targeted keyword while being short and easily readable.
Section 2: Retain the Original URLs for Well-Performing Posts
(If your site is new and you haven’t published anything yet, you can skip this section and the next one)
Do you have posts currently ranking on the first page? If so, avoid changing their links, as even correctly redirected URLs may experience a decline in traffic. This lesson was learned the hard way, resulting in a significant loss of organic traffic on one of my websites.
The solution, which I’ll share with you, is simple but not widely known:
Prevent potential issues by retaining the original URLs for well-performing pages.
This way:
- You improve the permalink structure of all your pages
- Help future posts rank better on Google
- And protect pages with decent organic traffic from being affected.
Follow these steps to keep your essential pages safe:
Step 1: Identify Your Important Pages
You likely know which pages receive significant traffic from search engines.
To ensure you don’t miss any, visit the Google Search Console and select ‘Pages’ in the Performance section. Sort the pages by traffic and create a list of high-traffic pages.
Alternatively, use tools like Semrush or Ahrefs to find your valuable pages.
Step 2: Use Custom Permalinks to Retain Original URLs for Listed Pages
WordPress permalink settings often cannot be used to revert changes.
This is because WordPress doesn’t allow “/” in a page slug and automatically replaces it with “-“.
The solution is to use a custom Permalinks plugin, which allows you to use “/” in the slug of each post, enabling you to choose a permalink structure for each post.
Here are the steps:
Step 1:
Install and activate the WordPress Custom Permalinks plugin.
Step 2:
Open the list of URLs for your important pages and set the old permalink for each page.
For example:
The new URL in our example is:
“YourWebsite.com/best-blogging-platform”
With the Custom Permalinks plugin active, you can revert to the original URL, which was:
“YourWebsite.com/2019/04/12/what-is-the-best-blogging-platform”

By doing this, your important links remain unchanged, and you avoid any SEO problems.
Repeat this process for every critical post you don’t want to change the URL for.
In summary:
Your new posts will have better permalink structures, while your important older pages remain untouched.
Section 3: Redirect Old Permalinks
(If your site is new or doesn’t have indexed pages, you can skip this section.)
When changing the permalink structure, you may have many published posts. You’ve already retained the original URLs for well-performing pages, but you still have numerous other pages that aren’t ranking well.
In this case, it’s better to apply the new permalink structure for those pages. This makes them more visually appealing and readable, while the improved URLs can help them rank better on search engines.
However, you must take an essential step to avoid broken links:
Redirect old links to the new ones.
By doing this, search engines will recognize that the links have changed, and your old links will serve to redirect traffic to the new URLs.
Redirection Types
There are five types of redirections, each with a specific code that helps search engine crawlers understand their purpose: 301, 302, 303, 307, and 308.
A 301 redirect is permanent, meaning the link has been changed forever. You should use permanent redirects for all your changed URLs.
There are several options for redirecting your old links.
Here’s how you can redirect them:
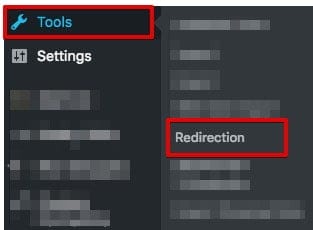
Redirecting Your Old Links Using the Redirection Plugin
The Redirection plugin allows you to easily point your new links to the old ones.
Follow these steps:
Step 1
Install and activate the Redirection plugin.
Step 2
Navigate to the Redirection settings.
Step 3:
Create a redirection for each link. In our example, if you want to change the URL of the post, you should set up a redirection like this:

Alternative Method: Redirect All Your Old Links in Bulk
If you have numerous pages and want to change the URL of all of them, you can do it automatically using the Simple 301 Redirects plugin.
This way, you don’t need to redirect URLs one by one. You can automatically redirect all of them.
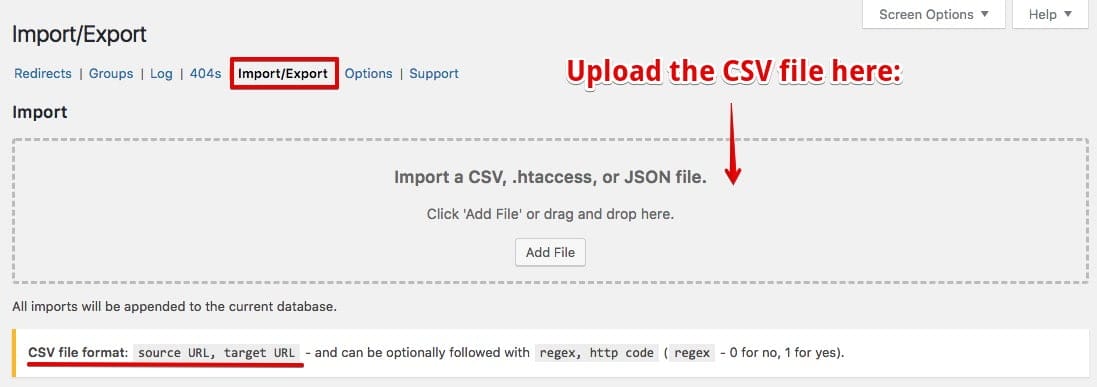
Here’s how to do it:
Step 1
Open the CSV file containing your old URLs. I explained how to generate it in Section 0.
Step 2
The CSV file should include two columns.
The first column should list the old URLs, and the second column should list the new ones.
It should already contain the old URLs in the first column.
To add the list of new URLs:
After changing your site’s permalink structure, go to the sitemap of your website and copy the list of new links into the CSV file.
The final version of your CSV file should look like this:

Step 3
Remove the links of your important pages from your list (pages for which you reverted the changes).
Step 4
Install and activate the redirection plugin.
Step 5
Navigate to the plugin’s settings.
Step 6
Click on the import/export tab and upload the CSV file:
What About Redirection Using a .htaccess File?
I believe it’s not a good idea to modify the .htaccess file for redirecting your URLs. It’s a critical file, and making a mistake can lead to serious problems.
You can accomplish redirection in WordPress with the aforementioned plugins without taking high risks.
For this reason
I won’t cover it here, but if you have sufficient experience and need to create different rules for redirection, you can use the .htaccess file.
Conclusion: Should You Change Your Permalinks?
URLs play a crucial role in on-page SEO, and WordPress makes it simple to alter your permalink structure.
So, if your permalink structure isn’t optimized, it’s worth considering a change as soon as possible.
This can help improve your rankings and drive more traffic to your site.
At the very least, optimize the URLs of your future posts.
To summarize everything:
- If your site is new, change the permalinks as explained, and you’re all set.
- If your site has published posts, take two additional steps after changing the permalinks:
- Revert the changes for important pages to prevent any impact on them.
- Create redirections for changed links, either one by one or automatically using a CSV file.
That’s all there is to it.
Feel free to reach out if you have any questions or comments.
And please share this article if you find it helpful.
Thank you for sharing your information on changing permalinks in WordPress.
My website is new and not many contents yet. I will change my permalinks structure to “Post name” option for future posts.
For my other posts, I will follow your instructions to change the permalinks. I hope my on-page SEO will be improved.
I’m glad that this post has been helpful to you. Since your website is new, this would be really easy to do and it will improve your on-page SEO.